Showing posts with label Main Course. Show all posts

Tuesday, September 23, 2014

Mexican Tamales

My obsession over International cuisines continue as I take a quick stop at Mexico.

According to the Wikipedia, "A tamale is a traditional Meso-American dish made of Masa (a starchy dough, usually corn-based), which is steamed or boiled in a leaf wrapper. The wrapping is discarded before eating. Tamales can be filled with meats, cheeses, fruits, vegetables, chilies or any preparation according to taste, and both the filling and the cooking liquid may be seasoned."

I wanted it to be as authentic as it could be. So I stuck to the original recipe and seasonings as much as I could. But catering to Indian and American households, I have also provided the substitutions wherever possible.


My Tamales are made with a basic Corn Masa Flourand not the powdery-fine, corn flour/ corn starch that is commonly found and is used as a thickening agent in soups and gravies. Try to find a flour with a high fiber content to keep them nutritious and healthy.
This is a pretty straight forward recipe and feel free to add your own twists and customization.

Here it goes:

Step 1- Filling:- 
First we start with the filling. I had some leftover rotisserie chicken from Costco which I deboned and chopped up fine. Here is the spice mix you can use to cook your choice of chicken, pork, ground beef or beans, depending on your preference.
1 lb or approximately 1/2 kg of partially cooked black and kidney beans/chicken/pork/ground beef
3 dried Pasilla chili (Substitution: Chipotle or Paprika powder ~2 tbsp, soaked in 1/4 cup warm water)
1 tbsp Corn oil
1 tbsp garlic paste or 1 tsp garlic powder
1 tsp onion powder
1 tsp roasted cumin powder
1 cup water
Salt to taste


In a sauce pan, heat the oil and saute the garlic paste if you are using it for a minute, then add the protein that you are using. Now add all the remaining ingredients and stir well to combine. Bring to a boil and simmer gently, on low for 1 hour. (If you are using raw beans, you could use a pressure cooker to cook it in the same mixture.) The goal is to get the spice into the meat or beans and make it really tender.
Once the water thickens up stir gently and remove the lid and make it mostly dry.
Keep it aside.

Step 2: Readying the Corn Husks:-16 Corn husks or Tamale leaves  (you could use banana leaves, which are also used traditionally to make tamales)
1 lemon


This is simple. Boil a large pot of water, then squeeze the juice of a lemon into it. Soak the leaves/ husk into this water and let soak for 10-15 mins. After 15 minutes drain them well. This step removes small bugs or germs from the leaves and also softens the leaves so that they become more pliable.
Keep aside.

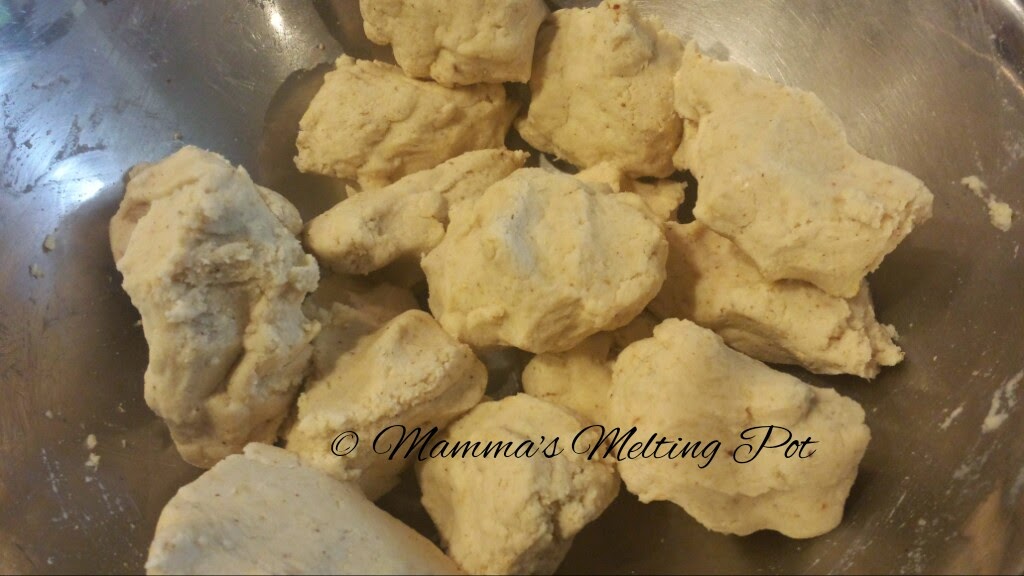
Step 3: Making the Masa or the corn dough mixture for the Tamales:-
2 cups Masa or whole corn flour
1 tsp baking powder
Salt to taste
1/2 cup lard/ butter or corn oil (I used oil though lard is preferred)
2 cups of vegetable/chicken stock or water


Stir together the flour, salt and baking powder well. Then using clean hands, knead in the butter/lard or oil that you are using. Lastly use the stock or water and knead it into a soft and  slightly sticky dough. It should be spreadable by a spoon.
Keep aside.


Step 3: The Assembling of a Tamale
Take a drained Corn husk, and using a spoon, spread a thin layer of Masa batter on the smooth side of  the husk, leaving a little space on the top and bottom.
In this, at the center put a small or large amount of filling, but always just enough to get coated by the Masa batter from all sides. The mixture must be enclosed, in the Masa.
Now gather the top and bottom ends and gently press along (from outside) the seams to seal the mixture in, and using a chef's cord or a thin strip of corn husk, securely tie the ends, holding the shape.


Step 4: To cook the Tamales:

In a large lidded pot, add about 1/3 part of water. Then using an inverted bowl, elevate and place a steamer to keep the tamales out of water. Stack the tamales carefully and cover with lid. Steam for an hour. Let cool for 10 minutes.


Step 5: Serving Suggestions:


These flavorful goodies can be eaten as is, after peeling off the husk. But you may also serve them with Salsa, hot sauce and Sour cream on the side.
I served mine with a dollop each of Sriracha and Sour Cream. 


Enjoy! :-)


Monday, September 22, 2014

Kerala style Pork Curry - Memories of an awesome childhood.

I was born and raised in a family of great cooks and grew up with wonderful neighbors and family friends who were excellent cooks too. S Aunty was the one who exposed my taste buds for the first time to the magic of deliciously decadent Trichur style of cooking. Every Easter and Christmas, her family would start their hard work in kitchen early, to create a feast fit for a king and we were fortunate to be invited to be a part of their celebrations.
We would pig out on Pork, Beef and Chicken, prepared at least two ways with Raitas, rice, rotis and veggie  preparations (that sadly, I cant remember, but yet very delicious) all washed down with one small glass of the sweetest Goan port wine that us kids were allotted.
That is where I was reborn as a true non-veg foodie enthusiast after my years of trying my hand at Vegan and Vegetarian lifestyles, at that tender age. (Thanks mostly to butchering videos promoted by Maneka Gandhi on television).
Anyways, S Aunty's cooking and the sweet memories we spent together as one big family, stayed with us even after the families changed homes and moved away, then to different parts of the country. Christmases and Easter were never the same again.
Mom wouldn't cook beef or pork in her kitchen, so I and my brother's only hope of sating our beef or pork cravings would be to order it from eateries but then there was no one who would cook it like hers.
And there came a time when I almost gave up pork because it never measured up to the good stuff we were used to.
I came to U.S and one of the best things here was the availability of great cuts of meat, easily. That is when that cravings I put behind me years back came back with a vengeance. I started experimenting with the memory of tastes I had and my own logic for help. I also had notes from the times I picked Aunty's brain on our visits to Trichur.
This curry is still not as yummy as what she made but yes, it is one of the simplest and most delicious ways to prepare pork. The gravy can be thickened or made dry as a fry. The onions cook down and give this dish a heavenly sweetness that no other ingredient can give it, coupled with the aroma of the other green ingredients. A pork belly is the recommended cut for this recipe and needs to be slow cooked for about 2-3 hours. Due to my health needs, I have used top loins which are the leanest cuts of pork and they end up dry if overcooked. So I have cooked it on low for about 45 minutes.
So adjust your cooking time accordingly.
Also it tastes even better the next day. So leftovers can cause family fights....be advised! ;-)


Ingredients:
3 lbs pork, cut into cubes
1 tsp turmeric
2 tsp Kashmiri chilli powder (or Paprika)
1 tbsp coriander powder
2 tbsp vinegar
1 tsp salt
2 large onions, sliced thin
1 tbsp crushed ginger
1 tbsp crushed garlic
6-7 chopped green chillies
2 sprigs curry leaves
10-12 cloves, 3 green cardamoms and 2 " piece of cinnamon, toasted lightly and ground into a powder.
1 tbsp + 1 tbsp of oil

Method of Preparation:-

Mix together the pork cubes, salt, chilli powder, coriander powder and turmeric and leave in in the fridge to marinate.
Meanwhile, heat 1 tbsp of oil in a dutch oven and saute the onions in it until softened. Add the green chillies, ginger, garlic and curry leaves. Let it get slightly browned and aromatic, in a low fire.
In another shallow pan, heat the other tbsp of oil and sear the pork without crowding them. Do it in batches if necessary.
Add the seared pork cubes into the onion mix. Deglaze the  searing pan with 1 cup of water and add into the onion mix.
Stir everything well, cover and bring to a boil. Add half of the ground spice mix. Now, reduce the fire and cook until the pork is done. Fattier or bone-in cuts may need more time, but loin or other lean cuts may be ready in as few as 15-20 minutes.
In the last 15 minutes of cooking, increase heat, remove lid and stir continously and get the gravy thickened to your preference. Check salt and adjust if needed. Stir in the remaining ground spices and remove from fire. Enjoy!


Saturday, May 31, 2014

Mamma's Pineapple Lemon Rice


Raised in Southern India, my carb of choice has to be hands-down, Rice.
Every vegetable or meat cooked in our home was designed to be eaten with rice or a rice flour dish. That kind of carb dependence takes a lot of years to outgrow, you know?!
I was lucky enough to be exposed to the melting pot of Indian cultures that is Mumbai where I kicked my rice dependency and happily embraced the flat-breads, fried breads and mainly, wheat!
But even then, my reboot meal remains rice.  Sometimes in my enthusiasm or distracted moments, I overestimate the amount of rice to cook. Mostly I cook a little extra because I love my leftovers. After a tiring day at the gym, or running too many errands for the kids, I would like to make a small meal of leftovers.
Now, this post is all about those says when you dont get to utilize those leftovers. In my mind, I always connect Lemon rice to our Summer Vacations. Mom always made a tangy, zesty lemon rice when she made too much rice or for the long train trips during Summer. Summer vacations meant taking a long, two-day ride in a chugging, diesel-engine train, all the way to the lower tip of the country, in sweltering heat.Budgets were low and outside food from peeps who didnt speak a language we could understand was out of the family rule book. So Mom made tried and tested menu items for the first day in the train. Nothing perishable could withstand the second day of the trip, when the bogeys turned into ovens and baked everything inside under the hot Andhra sun.  Mom's lemon rice was a life saver for the first day. She would also deep fry marinated Tuna pieces that had to be finished on the first day. She would make oil packed lemon pickles and Ginger in tamarind and jaggery, too. The next day there would be bread (which would be baked drier even in its unopened packing in the heat) and a jar of Kissan mixed fruit jam, to ease it down.
It may sound like the worst trip, but the kids had the most fun in those trips. We made new friends, sang and played, and climbed up and down the sleeper berth ladders a gazillion times while the grownups took a break from all the worrying and work and settled down to read or take naps. All of us looked forward to these trips, in short!
My Mom's lemon rice had been an inspiration to me always. She made it with almost al-dente rice, never sticky and tinged with that gorgeous yellow color from the turmeric. The tangy, comforting taste of the tempered rice always brings back a rush of childhood memories with it, that never fails to bring a smile to me.

Lemon Rice, made my Mom's way, served with my Chilli Chicken Curry. Mmmm, Heaven, I tell ya! 


A few days back, hubby brought home a huge pineapple, in season, from Costco. I had been looking at Pineapple recipes since that morning, but for some reason couldnt get my mind off Mom's lemon rice. Putting one and one together, I decided to make something different, yet simple for dinner and that is how this recipe was born.
So here goes:

Ingredients:-
2 cups Sona Masoori rice, cooked in 4 cups of water, and 1 tsp of salt and cooled. (you may also use leftover rice, from previous night)
2 cups (small) diced, ripe pineapples
1/4 cup fresh squeezed lemon juice
1 sprig curry leaves
1 tsp mustard seeds
1 tsp split black gram
1 or 2 dry red chillies
1 tsp turmeric powder
2 tbsp oil


Method:-
In a large nonstick pan, heat oil and temper the mustard seeds, black gram, curry leaves and dry red chillies in that order. Stir in the turmeric and add the diced pineapple. Add a tsp of salt. Saute until tender.
When the pineapple pieces are no longer crunchy, add the rice half cup at a time and incorporate into the tempering mix. Add lemon juice, salt and a tsp of sugar and stir well until well combined. Now cover and cook on low heat until the lid is steamed well. Takes about 15 minutes.


Serve warm, with a Spicy Chilli Chicken Curry or Cashew Chicken Curry or Mamma's Whole Chicken Curry in a Tomato Gravy.
It goes very well with Spicy Vegetarian Sides like Rajma, Chole or Paneer curries.


Enjoy!!! :-)

Friday, May 30, 2014

Mamma's Whole Chicken Curry in Tomato Gravy


I have always been a big fan of chicken since childhood. Mom's chicken curry was the ultimate bribe, to get me to do anything. When guests came over, all I could pray was, for leftovers. That was how much I loved Chicken Curry. Now that I am really watching my food quality and cooking  healthier meals, I realized I have to try finding a better way to make Chicken curry without coconut milk or the rich cashew paste, which used to be my go to recipes. That is how this recipe took form.
A bowl of rice served with this chicken curry is heaven, and it may be just as yummy, served with two chapatis. This curry is the leanest version I have managed to make. Also, I use a tender Chicken or a couple of Cornish game hens, with their skin removed. The using of a whole chicken is what makes this curry full of flavor. You just cannot get that kind of wholesomeness with dry chicken breasts without bones. With the skin added, this curry goes to a whole another level and gets that golden, floating oily layer at the top which just makes eating it with rice even delectable.
This recipe, uses only 2 tsp of oil and you can add or reduce the gravy content by adding water. Adding more oil to it wont make a difference, but depending on your preference you can make this curry with the chicken skin or without.
So here it goes:-


Ingredients:-
1.5 kg whole chicken (about 3 lbs)- skinned, cleaned and chopped into medium pieces.
2 large onions - thinly sliced
1 can of tomato paste (about 6 oz)
6-8 green chillies, slit
1 large piece of ginger, crushed
12 pieces of garlic, crushed
Turmeric- 1/2 tsp
Chili powder - 1 tsp
Coriander powder- 2 tbsp
2 tsp Spice mix (1 bayleaf, 3 green cardamom, 1tbsp fennel seeds, 1/4 tsp cinnamon, 2-3 cloves and 1 small star anise roasted and powdered)
Curry leaves- a handful
2 tsp oil
Coriander leaves- to garnish.


Method:
1. In a heavy bottomed nonstick pan, heat 2 tsp of oil and swirl it around and add the chopped onions to it. Add a tsp of salt to it and saute well.

2.When glossy, add the green chillies, ginger, garlic and curry leaves to it. Cook for 2 minutes. Add the coriander, turmeric, chilli powder and half of the powdered spice mix to this. Be very careful and do not let it burn. Keep stirring for one minute.

3. Now add the chicken pieces. Add a little more salt (abt 1/2 tsp ) and mix well. Now cover with a tight lid and lower flame to medium and let it cook for 15 minutes.

4. While its cooking, mix the tomato paste with 3 cups of water. After 15 minutes, give the chicken a very good stir and add the mixed tomato paste and water to it. Mix gently and cover with the lid. Bring to a boil and again reduce it to medium. This time let it simmer for almost 20-25 minutes.

5. After 20-25 minutes, it should be a little thicker and giving out a nice aroma. The meat will be really tender. If not, cover and cook another 10 minutes. Add the remaining spice mix and check salt.

6. Remove from fire and garnish with chopped coriander leaves.

7. Serve hot with rice or rotis.


Did I tell you, this curry becomes even better the next day? :-)

Tuesday, May 13, 2014

Seared Salmon with Ponzu Sauce and steamed Bok Choy

 I have always leaned toward Chinese and Japanese cuisines, whenever I felt like venturing out of my food comfort zones. And these two nations have never disappointed me with their light sauces and fresh ingredients where one flavor doesn't kill off the other or weighs you down as a meal.
Ponzu sauce is a citrus based dark brown sauce, very common in the Japanese cooking.
This version in the recipe is a lighter version. The authentic version is made by simmering Mirin, Rice Vinegar, Tuna flakes and Kobu together and then adding some citrus juice to it.This meal is one of the first non-Indian meals I have attempted to put together. The recipe was simple and everyone loved it. The original recipe courtesy goes to Food Tv, my food guru in the days when I couldn't cook anything. over the years, I have adapted the original recipe to suit my family's taste. Also, I serve it with either cooked plain rice noodles or with Corn on the Cob, as a side. This recipe serves a family of 4.

Ingredients:-
Salmon Fillet with Skin, served on a bed of Rice Noodles, drizzled with Ponzu Sauce and Steamed Baby Bok Choy. I used Jalapenos for some extra kick in my Ponzu.


For  the Ponzu Sauce:

1/2 cup soy sauce
1/4 cup veggie/chicken stock
2 tablespoons rice wine vinegar
2  tablespoons orange juice
2 tbsp of orange zest
1 tbsp fresh ginger, minced
2-3 thai green chillies, chopped
2 stalks of spring onion, thinly sliced (bottoms and top separate)

Other Ingredients:-
1 lb of fresh bok choy, rinsed well and trimmed
4 salmon fillets (Now the original recipe calls for skinned fillets but I am a big fan of crispy seared fish skin, so I used fillets with skin on them and seared them skin down first, then cooked it on the other side too. If you choose to cook with skin, see my note on serving below*)
Salt and Pepper


Directions:-
Whisk all of the Ponzu sauce ingredients in a small bowl and set aside.
Steam the Bok Choy and keep aside.
Meanwhile, heat a large nonstick skillet over high heat. Season the salmon with the salt and pepper, lay the fish rounded side down in the pan (*skin side down if using fillets with skin) and cook until golden and crisp on 1 side, about 2 minutes. Reduce the heat to medium, turn and cook the fish on the remaining side to the desired degree of doneness, about 10 to 11 minutes for fish cooked through.

Divide the salmon and bok choy among 4 plates and serve each drizzled with 2 to 3 tablespoons of the ponzu.

A Variation: Tilapias (pan-roasted with a sprinkling of seasoned panko bread crumbs to give it some crunch) made using the same recipe.

*Salmon fillets with skin need to be served in a different way. Spoon a couple table spoons of Ponzu sauce in a plate, and lay down the fillets skin-side up so that the meaty side is in contact with the sauce at the bottom.

 Pass extra sauce at the table. Leftover sauce can be stored in the fridge in an airtight container for up to a week, or even be used as a dip for Sashimi or Tempura fried Seafood.
Let me know how you like it! Enjoy! 

Thursday, May 8, 2014

Scotch Broth - A delicious soup from Scotland

I am a big fan of simple food such as Soup and Bread. There is something deeply comforting about dipping a piece of chewy bread into a shimmering hot liquid composed of veggies and possibly meat, and popping it into the mouth. The single-minded, repeated motions of scooping up the chunky liquid, on a fat spoon and balancing it on its way to the mouth has a way to calm the mind and settle the growls of a hungry stomach.
Having made clear my point, that I love soups, let me move on to today's edible experiment at Mamma's Melting Pot.

I have been on the lookout for using up my barley pearls, and many experienced foodies suggested soup. I particularly loved the notion of getting barley grains in soup mainly because of the texture. I also have fond memories of my dear friend T, bringing me hot soup when I had one of my bad, evil Sinus infections. Her soup was a God -send! The soup itself was light with a few chicken pieces and cooked barley at the bottom, and I could see perfectly cooked veggies in the clear broth, which emanated the spicy savory aroma of freshly chopped parsley. I wasn't in a position to ask her what it was called or how it was made, due to the pressure in my forehead and the facial pain. All I knew was I was hungry and I gobbled it all up, grateful for angels like her in my life. But the soup never left my mind.

After almost a year, as the foodies discussed possibilities of barley in soup all I could think of was my buddy's soup. As I described the soup, a couple of them identified it as Scotch Broth- the basic soup made by the Scots. Traditionally, the soup is made of 4 main ingredients: Beef or Lamb, Swedes/Neep aka Rutabagas, Barley and Parsley. Every thing else can be substituted or played with. And so it was decided!
I made it yesterday night and served it with Fresh Bread buttered and toasted with Homemade garlic Butter.
I didn't have time to go get some soup bones or lamb from Butcher so I used up a pound of beef stew meat I had in the freezer. I am glad I used that because, the meat was extra lean and there was hardly any fat to skim off, in the soup. The soup was nutritious, very hearty and light. It filled up everyone without weighing them down. And making it was very simple too. This recipe is here to stay!
Here is how I made it:

Ingredients:-
1 lb of lean Stew Meat (Mutton, Lamb or Beef)- trimmed into bite sized cubes.
(Alternately, you can also use Meat or Chicken Stock. Instead of adding meat and water, just add meat stock)
1 cup diced Rutabaga (also can be substituted with turnips)
1 cup diced carrots
1 cup diced onions
2 cups diced leeks
1 cup diced mushrooms
2 tbsp minced garlic
1 cup pearl barley, soaked for a couple hours.
Salt and Pepper
Cold water- 12 cups
1 tbsp butter
1 cup minced fresh parsley (garnish)


Method:-
In a large Soup pan, melt the butter and lightly saute the garlic. When garlic is sweaty, add the onions and keep sauteing for another couple of minutes until soft. Add the meat, some coarsely crushed pepper and a tsp of salt. Stir once and add the water. Bring to a boil, reduce to simmer, cover and cook for 30 minutes.
After 30 minutes, add the barley. Bring to a boil, then cover and cook on simmer for another 30 minutes.
Skim off and discard any fat that rises to the surface.
Add the chopped veggies (save the parsley) to the soup for the last leg of cooking. Simmer for about another 30 minutes or until veggies are cooked. Take care they are cooked to the point they are tender but not crumbling.


Switch off the heat, add the chopped parsley and stir well. Add salt and pepper to taste. Serve hot with Toasted bread sticks or Garlic bread.

To make my special Double Garlic Butter, Mince 5 cloves of garlic very finely and add to 2 sticks of salted butter,softened to room temperature. Stir in 1 tsp of garlic powder. Mix well using a hand mixer or a food processor or just a fork. Refrigerate in a closed container for an hour, before using. You can also roll it into tiny balls, and freeze for later use.


Use this butter to butter up the toast generously, then bake them/toast them in the oven until desired "toastiness" is achieved, and serve with the soup.
Enjoy! 

Monday, May 5, 2014

Falafels - A yummy Vegetarian Treat from the Middle East.


Falafel is a deep-fried ball or patty made from ground chickpeas, fava beans, or both. Falafel is a traditional Middle Eastern food, usually served in a pita, which acts as a pocket, or wrapped in a flatbread known as lafa. The falafel balls are topped with salads, pickled vegetables, hot sauce, and drizzled with tahini-based sauces. Falafel balls may also be eaten alone as a snack or served as part of ameze (appetizers). (quoted from Wikipedia)


I have been wanting to try making thee for a long time now. Finally last Friday, I decided to go with my Middle East dinner theme and make these for my family. I bought some cute-looking Mini Pitas from the local grocers' and picked up some fresh herbs and feta. The rest I had in my pantry.
You wont believe how simple these are, to make once you have everything prepped.
So here goes the recipe:

Falafel Patties:- (makes ~30 patties)

Ingredients:
 2 cups soaked chickpeas, soaked one full day and night
Oil, for frying
3 tablespoon olive oil
5-6 cloves minced garlic

1 whole bunch green onions (white and green part) finely chopped
1/4 cup chopped fresh parsley leaves
1/4 cup  chopped fresh mint leaves
1/4 cup  chopped fresh coriander leaves
1 lemon's juice
2 teaspoons cumin powder
3 teaspoons coriander powder
salt, to taste
Freshly ground black pepper


Method:
Drain the water used to soak chickpeas, then rinse well. Drain the chickpeas very well.
Using a food processor, pulse the garlic, drained chickpeas, green onions, parsley, mint, cilantro, lemon juice, cumin, coriander, salt and pepper together. Add 3 tbsp of olive oil while pulsing. Pulse until the mixture is finely ground and a little fluffy.
Using damp hands, form tiny golf ball sized balls and press lightly to form a patty.
Traditional falafels are made into ball shape. I made them into patties because, personally I feel they cook much better that way, especially since I am using raw soaked chickpeas and not cooked chickpeas from a can.
Heat about 3 inches of oil in a cast iron pan or fry pan. Repeat with the rest of the patty mixture, to form patties.
Over medium heat, fry the patties to a golden brown. High heat is not advised as the insides may not get cooked, leaving the outsides too browned.
When evenly golden brown, take the patties out of the oil and drain on paper towels.
Keep aside.

For the Yogurt Sauce:
1 cup greek yogurt
1 tbsp lemon zest
1 tbsp tahini paste (or pulse 1/4 cup soaked sesame seeds with 2-3 cloves of garlic and a tbsp of sesame oil and make your own)
1 tsp cayenne pepper
Salt and pepper - to taste
1 tbsp minced mint and parsley
1 whole cucumber, grated


Method:-
Add everything to a blender except the mint, parsley and cucumber and pulse until smooth. Stir in the cucumber, mint and parsley, cover with a cling wrap and refrigerate until needed.

For the Pita Pockets: 
Large or mini Pita pockets, warmed --count 3 minis per person or 1 8 inch pita per person (with 3 patties for stuffing)
Chopped Iceberg or Romaine lettuce
Pickled veggies like carrots, cucumbers etc (optional)


Assembling:- 
Take a Pita pocket, stuff it with some lettuce, one or two pieces of pickled veggies and a Falafel patty. If you are using a bigger Pita or Lafa (Taboon Bread, usually served in the Middle East), you can use 3 patties.
Drizzle a tablespoonful of the yogurt sauce inside the pita but over the patties and serve immediately.
Remember to not keep the Pita and Falafel for long once you add the yogurt sauce.


Eat it as a dinner, breakfast or even as a snack. These never disappoint! Enjoy! :-)

Also see, Kashk-E-BaadamJan or Eggplant Dip, another delicious way to enjoy your Pitas with.

Tuesday, April 15, 2014

Spinach and Bacon Gnocchi (Italian Gnocchi from scratch)


After a long spell of Vegetarian Fare, I was in the mood to break that spell with something I haven't tried before. In that idea-craving mental state, I went through my resources- my cookbooks, my magazines and my bookmarked recipes. And finally decided on this cute little pasta that is simple to make and tastes really good.
Gnocchi: Gnocco (singular) is a thick, soft pasta that can be made from semolina, or wheat flour or all purpose flour.
It is usually eaten as a first course and replaces pasta and the soup course. I have always heard from Italian friends that they never buy Gnocchi from the supermarkets, but its always made at home. I had a lot of apprehension in making something that was totally outside my comfort zone. But they assured me, that is exactly how they felt about making samosas from scratch too! And I knew from experience how tasty the result could be if I succeeded.

Once I made up my mind, things got easier. There was no fancy ingredients to be bought, there were no lengthy preparations to be done. I had all the ingredients at home. So here was how I got to the end product.


Ingredients:-

For the Gnocchi:
2 cups all purpose flour or whole wheat flour
8 oz ricotta cheese
1 tsp garlic powder
1 egg
Salt- to taste

For the Spinach and Bacon Gnocchi:
1/2 stick butter
 2 tbsp fresh, minced garlic
2 tbsp chopped bacon
A bag of fresh baby spinach
1 tsp dried basil or 3 tbsp fresh chopped basil
freshly grated Parmesan- to top
1 recipe Gnocchi
Salt and Pepper - to taste

Method:

1. Mix together all the Gnocchi Ingredients. You could use a hand mixer or stand mixer. (I used my hands. I knead chapathi flour on an almost daily basis for my dinner. Kneading by hand comes naturally to me.)


2. Knead it until it forms a stiff but nonstick dough.
3. Cut the dough into 8 equal parts.


4. Stretch each portion and roll into a long cylinder, of ~ 1/2 inch thickness, then cut into tiny bits.


5. Take each bit and using the back of a fork, roll into gnocchi and dry them out a bit in a single layer for an hour.
I used 2 forks because my single forked attempts kept giving it a gnocchi shape only on one side. If you are not sure how to go about it, search for gnocchi videos on you tube. There are some really good ones out there, discussing technique.


Now this step takes hours if you have a larger batch to roll. Shamelessly employ your kids, neighbor's kids or anyone else who makes the mistake of walking by when you are doing this dread-work.

6. Now after what will feel like the longest hours of your life, once you are done with the rolling of gnocchi, let the rolled Gnocchi bits dry out for an hour in a single layer. You could also skip the drying and go directly to the boiling, if you want it faster.


7. Boil a pot of salted water. (You may add a tablespoon of oil to this water, though these Gnocchi wont stick to each other unless you cook a lot of gnocchi in one go.) Lower the heat to a simmer - a medium flame, should do.
8. It is recommended that you add the gnocchi into this water in small batches. Do not stir. When they float up on their own, they are done. Remove with a slotted spoon or spider and keep aside.


Now, following are the directions to make this yummy, simple dish that I made with my Gnocchi:

 Spinach and Bacon Gnocchi

1. In a pan, melt 1/2 stick butter and add 2 tbsp fresh, minced garlic to it. Saute for a minute, then add 2 tbsp chopped bacon to it until cooked. It could be crisp or soft according to your preference.


2. To this, add baby spinach and stir until the spinach is wilted. Add fresh ground pepper and 1 tsp dried basil or 3 tbsp fresh chopped basil. Stir.


3. Add the cooked gnocchi and stir gently. Check salt.


4. Remove from fire, serve immediately with freshly grated Parmesan on top.


Enjoy! :-)


Thursday, March 13, 2014

Mamma's Mutton Curry

In my personal opinion, Mutton or Goat Meat has one of the cleanest flavors out of any other meats. My Mutton Curry is the combination based on the Mutton Curry preparations of two of the strongest characters in my Family--My Mom and My Father-in-Law. I have found their recipes for this dish absolutely out-of-this-world-yummy! But
During the hot summer months, Mom used to forego the easily available Chicken (supposed to increase body heat) and buy Mutton instead, which she believed to have a cooling effect on the body.
She used to make it spicy, the heat coming more from the green chilies and ginger rather than the cayenne.
We used to have it with Chapatis or Rice and always with a side of salted yogurt, cooked as a Morucurry or raw as in a Raita.
Years passed but the combinations of spicy Mutton Curry and Yogurt has always been a great source of comfort to me. Yet, the recipe of the Mutton Curry was pretty much hazy to me.
When I got married, my Father-in-law surprised me with the best Mutton Curry I have ever tasted and inspired me to pay more attention to spices and cooking techniques. His Mutton Curry was a full-flavored curry, but less spicier than Mom's. He never used oil in his curry but his secret was the mutton fat bought separately from the butcher, in which her fried the marinated pieces of meat in its own juices, spiced delicately with his secret spice mix.
When he was diagnosed with heart disease, the women of the family made it their personal business to cut down the fats and make him, healthy and wholesome food. Animal fat had to go! But we didn't have the heart to deny him his favorite Mutton Curry once in a while. My MIL, being a vegetarian, passed down to me the responsibility of cooking the meat for him.
Now, I had to make sure it tasted good, to his liking and also was was safe for his heart.
So I used his spice mixes and Mom's techniques and made this Curry.

To make a long story short, he loved it. The price I had to pay for it is that he doesn't make his version anymore. He just buys the meat and gives it to me, with a smile. That does it for me! :-)
Hope you all like this recipe too.


Ingredients:- Mutton (not lamb) : about 3 lbs (shoulder or leg works best. Also make sure you have bones in the meat. Fewer things in this world are as yummy as the bone marrow from the goat bones, smothered in the gravy.)- cut into bite sized pieces.
1-inch piece of cinnamon- 2
Star anise- 1 whole and a couple broken pieces
1 bay leaf
6 Cloves
1 large Black Cardamom


Red Onions: 3 large, peeled and chopped into thin slices
Green Chillies : about 10-12 (reduce or add as per your heat tolerance), chopped
Curry Leaves - 1 large sprig
Fresh ginger, minced :  2 tbsp
Fresh Garlic Minced: 2 tbsp

1 tsp cinnamon (powdered)
1 tbsp Fennel Seeds- powdered
1 tsp Green Cardamom Powder
1 tbsp coriander powder
1 tsp Chili powder
Turmeric powder- 1 tsp
Salt- to taste
Pepper (freshly ground) - 1/4 tsp

3 large potatoes, each- cut into 8 pieces
2 tbsp Coconut Oil
2 cups of thick coconut milk (divided)
Garam Masala powder

Coriander leaves/ Cilantro: 1 bunch, washed, trimmed and chopped


Method:-
In a Dutch Oven, or a very heavy Pan, heat 2 tbsp Coconut Oil and fry the whole Cinnamon, Cardamom, Star Anise, Bay Leaf and Cloves, until the cloves crackle a little.
Add the onions and a little salt, and saute it, until soft and glossy. Add the minced ginger and garlic and green chilies and saute well. When the mixture is a little softer and aromatic, stir in the spice powders (Cinnamon, Coriander, Chili, Pepper, green Cardamom and Turmeric) and 1 tsp salt.
Now reduce heat and add the cut pieces of Mutton to the Onion mix. Stir well until coated. Add 1/2 cup of the coconut milk, to help with the coating of the spices. Cover with a tight fitting lid and cook for about 15 minutes on low heat.
After 15 minutes, remove the lid and stir well. It should be more watery than it was before.
Add 1/2 cup more of the coconut milk and add 1 cup water. Throw in the Curry leaves and potatoes, stir well cover with lid once again. This time slow cook for 30 minutes. If needed, stir occasionally.
Check meat for done-ness. If not cover and cook for another 15 minutes.
When meat is really tender, and seasonings well permeated, stir in the last of the coconut Milk, Garam-masala and coriander leaves. Take off the heat. Stir well and cover and let sit for 10 minutes before serving with Rice or Chapatis.


A Kachumber Salad (chopped cucumbers, green chilies,onions and tomatoes in salted yogurt) goes very well with it. Featured here, is my Mutton Curry with some Yogurt Rice.
Enjoy!


Wednesday, March 5, 2014

Sabudana Khichdi

Sabudana aka Tapioca Pearls are one of those culinary ingredients used in Indian traditional cooking. Tapioca aka Cassava Roots are processed to create these pearls, which look a lot like hailstones around here. I grew up in 2 different states and I was fortunate enough to be exposed to two different approaches to cooking these cuties.
In Kerala, usually these pearls are used in desserts for thickening, or cooked in milk and sweetened with a little sugar, as a Vrat food or for health related recoveries, as its a very simple, easily digestible carb suited to not taxing out the digestive system.
In Maharashtra, these were hardly made into anything sweet. Instead, they were soaked and gently cooked along with a host of local, fresh ingredients into a filling Khichdi.
But both states seem to have approved the Tapioca peals as an authentic Vrat food. Now only if they would be this unanimous in politics!
The best Khichdi I have ever eaten was prepared by one of our neighbors Mrs Gadgil, whose cooking would scent up the entire floor of our building. I never got a chance to learn from her (I was too busy playing Cricket and climbing trees) but I dedicate this recipe to her amazing cooking prowess.


Ingredients:
1 cup sabudaana- soaked 3-4 hours
(First rinse the sabudana pretty quickly with cold water and then fill the container with water exactly 1 inch above the sabudana level. Once it gets absorbed, fluff it with afork and add a little more water. The goal is to soak the sabudana enough to get rid of the hard kernel in the center of the pearl. Taking a pearl and squeezing it gently, will tell you if you need to add more water or not.)

1 cup roasted, salted peanuts
1 inch fresh peeled ginger
1 tbsp roasted jeera
2 tbsp raw peanuts
4-5 slit green chillies
1 tbsp chopped curry leaves
1 tsp jeera
1 medium potato, peeled and cubed
2 tbsp Peanut Oil
Fresh grated coconut and Chopped coriander leaves- to garnish


Method:-
Dry grind the roasted peanuts, ginger and 1 tbsp roasted jeera, until it resembles a coarse meal and keep aside.
Heat 2 tbsp Peanut oil in a heavy pan and fry the potato cubes until browned and crispy. Drain and keep aside. In the same oil, add 1 tsp jeera, raw peanuts, green chillies and curry leaves and fry in low heat until the peanuts are cooked. Then slowly add the soaked, drained sabudana and stir gently, until its coated with the remaining ingredients and oil. When it starts steaming, add the dry ground peanut mixture and stir well. This mixture keeps the sabudana from sticking to each other. So if it gets sticky as you cook it, add some more crushed peanuts. Check salt now and adjust.
Keep stirring in med-high heat until Sabudana is cooked completely.
Serve hot, garnished with coriander leaves and coconut. Enjoy!


Thursday, February 27, 2014

Mamma's Chilli Chicken Curry

A long time ago, I had posted my Chilli Chicken recipe, which was more of a dry, appetizer kind of recipe. It was amazing with Rotis and on its own, but with rice as an accompaniment, it seemed a little too dry. So I made it into a curry version following the general Indian-Chinese cooking fundamentals. Without much blah, here it goes:


Ingredients:-
4 boneless skinless chicken breasts---cut into bite sized pieces
For Chicken Marinade:
3 tbsp soy sauce
1 tsp fresh ginger paste
2 tbsp corn starch


Other Ingredients: 2 tbsp each of fresh ginger and garlic, minced
3 stalks of green onion--the tops and bottoms separately chopped
1 med red onion---cut into thin strips
Bell Peppers or Capsicums---3 large, cut into strips
Cilantro---1/4 cup finely chopped
Green chilies (Thai or Indian. If using Serranos, use half the number mentioned here)--- 7-8, chopped
Oil--- to roast the chicken + 2 tsp
1 tbsp soy sauce
1 tbsp white vinegar
1 tsp sugar
1 tsp garam masala
salt and pepper

2 cups of chicken/vegetable stock
2 tbsp corn starch
4 tbsp cold water


Preparation:-

Mix the marinade ingredients in a large bowl, with a whisk.
Now throw in the chicken cubes into the batter and mix gently to coat. Let marinate for 30 mins, in the fridge.
Grease a nonstick skillet or omelet pan with 1 tsp of oil and brown the chicken pieces on both sides, in medium heat. It will take very less time. Do it in batches if needed, and keep warm.
Now in a Non Stick saute pan, heat 2 tsp of oil and saute the minced ginger and garlic. When they are tender and aromatic, add the red onion and bell peppers. Cook the bell peppers until tender, then add the green onion bottoms and green chilies. Reserve the tops for garnish. Cook for a minute and add the soy sauce. Finally add the chicken, and toss gently to mix.
Add the veg/chicken stock, sugar and vinegar. Stir once again and cover with a lid. Bring to a boil. Cook until chicken is cooked all the way through. Add some fresh ground pepper and the garam masala and stir to mix.  Check salt and seasonings.
Mix the corn starch in the cold water well, and pour it on the boiling stock. Stir. You will see the sauce thickening up. When the gravy becomes glossy and is smooth, (about 2 mins) switch the heat off.

Garnish it with chopped cilantro and reserved chopped onion tops. Serve hot on top of rice. Enjoy!

Saturday, February 22, 2014

Mamma's Beef and Broccoli Stir fry

I absolutely love stir fries. There is something about vibrant veggies cooked to a crisp tender and lightly coated with sauce intermingled with  succulent morsels of a protein, that I just cant get enough of. If I ever had a chef who would make me a stir-fry, I know I can give up every other food I know just to have a different stir fry every day.
This dish happens to be a regular menu item whenever we order Chinese takeout. Sometime back, my favorite Chinese Joint moved away and I was in a total fix. The other nearby joint didn't even come close. That's when I seriously thought about making this at home. If they can whip it up "in 30 minutes or you get free egg rolls for every order", then maybe I could do it too, (without the egg roll offer, obviously!)
I had bought a brand new wok recently. All I needed was beef, since the only beef we ever bought was ground beef, for making hamburgers and pasta sauce. Both my boys hate the stuff and my girl is going through a "snack-only" phase where she has shunned off anything that is not a snack.
I went to the local market where butchers are really friendly and very helpful, and exceeding my expectations, they helped me to select a cut suitable for stir fries and also let me find a managers discount for the meat. SO I returned home with about 2.25 lbs of Tri-tip steaks and a smile. Its either that they hire really nice people or maybe I am blessed to be a woman who has good manners and a pretty smile. (wink!)

Anyways, I didn't want to make too much the first time, so I used just 1.5 lbs of the meat and about 2-3 lbs of the broccoli.
This simple sauce is so good you wont have to ever buy another bottled Teriyaki or stir fry sauce again. This yummy sauce just needs a handful of things that you might be using already. If these aren't in your pantry, just go and stock them up...because, this sauce is good with chicken, shrimp and just plain veggies too. Follow the same recipe and just mix and match the meat.
Also, I have tried reducing oil and refined flours in this recipe, without compromising on the sweet and the light spicy kick, from the red chili sauce. Feel free to customize the taste your way.

This recipe serves 6-8.


Ingredients:-
1.5 lbs of Tri-tip Steak or Flank Steak, sliced into 2-3 inch strips
1/2 cup of reduced sodium soy sauce
1/2 cup packed brown sugar
1 tsp garlic powder
1 tbsp each of minced ginger
2 bunches of green onions- chopped, stems and leaves separated.
3 lbs broccoli florets
4-5 dry red chilies (optional- you may use red pepper flakes too)
2 tbsp peanut oil
Freshly ground pepper
Toasted Sesame seeds (to garnish)


Method: In a bowl, combine soy sauce (reduced sodium), brown sugar and garlic powder until well combined. Add the sliced beef into this mixture and gently stir until every piece is coated in the mixture.
over with plastic wrap and stash in the fridge for the flavors to "mingle".

Meanwhile, steam the broccoli lightly. It should be tender-crisp; not soft and wilted. Sprinkle a little salt on top, toss lightly. Keep aside.

In a large wok, heat the oil and add the ginger and red chilies. Make sure you turn the heat down, to keep the chilies from smoking. (And if they accidentally, start smoking, switch off the heat, cover the wok with a lid and step away, until the smoke dies.)
If you are using red chili flakes, add them at the end.

Stir for a minute, then add the green onion bottoms. Save the green tops for later.
Now, drain the beef, reserve the marinade and throw in the beef into the wok and cook on high heat until the beef strips are cooked halfway. Add the marinade and bring to a boil. Cook until the beef is completely done and the sauce is boiling (about a minute). Check seasonings.

* If you prefer the sauce to be thick, at this point, you can add 2 tbsp of corn starch mixed in 4 tbsp water and add to the sauce*

Now add the broccoli florets and stir to coat. If you are using red chili flakes, add them now and stir well.
Switch off the heat and let sit for 10 minutes.

Garnish with onion tops and toasted sesame seeds, and serve hot over rice. Enjoy!


Mamma's Easy and Simple Eggplant-Spinach Lasagna


In the past, many times I have wondered, if my kids were spoiled rotten, since they request a non vegetarian menu every single day. That may not be a big deal for non-Indians but most Indians do get it. It may or may not be a religious thing but most households, (at that time...now everyone I know is in a mad rush to incorporate mass produced food in their daily menu AMAP), cooked non vegetarian fare only twice a week- Wednesdays and Sundays.
The reasons for the limited use of non vegetarian cooking, as I think, seems to be economical, religious and some ancient wisdom. The ancient wisdom in this particular habit being simplicity and keeping indulgences to minimum, keeping a firm control over the tendencies to go overboard. No wonder, two generations back we had the healthiest seniors around.
Either way, I decided a couple years back to enforce this little bit into my life. Even after trying to be a perfectionist in introducing fresh fruits, vegetables and whole grains, in a timely manner and yet...
I have one kid who could eat fish - steamed, fried or curried three times a day, every day, loves fruits but wont touch a vegetable. And another who detests any kind of seafood and actually throws up if a piece actually crosses his lips. And he loves his vegetables cooked.
Now, you might all agree that between both of them, I have to cook really creative or incur the wrath of one. That's when I enforced two purely non veg days into our week. Initially, it was met with grumbles. But with my supportive hubby's backing, it soon became an important part of our home traditions. When eating out, my husband and kids are free to follow or not follow this, but at home, any food cooked by me follows this rule. As a result, my dinner menu is more elaborate in vegetarian dishes, and the ones, I started this tradition for, are eating much better. So much better that sometimes, they request a vegetarian item, on a non veg day.
So here is one of my more popular dishes for a Meatless Friday. Its one of the simplest lasagnas, made with entirely non vegetarian ingredients (not vegan), if you can manage to get egg-less pasta.


Ingredients:

12-15 Lasagna Noodles, cooked and drained and coated in a little oil spray (so that they dont stick to each other)
4 cups Mamma's Hearty Pasta Sauce or Marinara (You can use the vegetarian variation or the Meat Sauce Version)

5-6 cloves of minced garlic
10-12 oz of chopped spinach
2 large eggplants, thinly sliced
1 lb or 850 gm skim milk Ricotta Cheese
1 cup grated Parmesan
1 tsp Italian herbs (basil, parsley and oregano)
1/2 cup mozzarella cheese
Olive oil- 2 tbsp + 2 tbsp
Salt and Pepper


Method: 
In a large nonstick pan, add 2 tbsp olive oil and toss the eggplant slices in it. Sprinkle salt and Pepper. Cook in low heat, until they wilt a little. Keep aside.
In the same pan, or maybe another, add 2 tbsp of olive oil and saute the garlic until a little sweaty. Add the chopped spinach and cook until wilted. Stir in the Italian herbs and add a little salt and pepper. Remove from heat and gently stir in Ricotta and Parmesan. Keep this mixture aside.
Preheat oven to 375 degree F and spray a Lasagna Pan with a little bit of oil.
Add 2 cups of the Pasta sauce to the pan. Lay 3-5 noodles on top of the sauce. Spread the spinach and cheese mixture on the noodles and arrange a single layer of the eggplant slices on top of it.


Next, add another layer of noodles, and repeat the steps until the noodles and the mixture are all used up.
Pour the remaining pasta sauce on top and smooth it out. Let the sauce drizzle down the corners.
Sprinkle the mozzarella on the top.


Bake in the preheated oven for 30-45 minutes until the cheese on top has melted and light brown spots start appearing.

Let stand for 15 minutes before serving. Enjoy!!!


Notes:-
1.
This is a very mild and basic recipe and you can add spices and herbs to give it your own twist.
2. Substitute eggplants with cooked chicken or mince meat, or use a Meat Sauce, to make it a yummy non vegetarian dish.