Showing posts with label Desserts/ Treats. Show all posts

Saturday, October 18, 2014

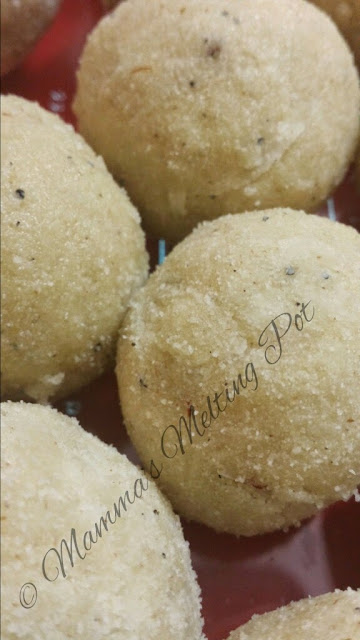
Mamma's Rava-Coconut Laddoos - Deepawali Faraal 3/5

Sweet and chewy, these are my very own recipe painfully developed by trial and error, over the last two Diwalis, with the inclusion of sweetened baking coconut, instead of freshly grated coconut, so that they could have a longer shelf life. The only sad part is that after all that trouble that we go through to make these, they don't last more than 3-4 days in our house.


Ingredients:
4 cups fine rava (semolina)
10 oz sweetened coconut flakes
1/2 cup  ghee (clarified butter)
1.5 cups sugar
1.5 cup water
1 fat pinch of saffron strands
2 tsp cardamom powder
Raisins as needed (Golden green raisins recommended)


Method:
In a heavy bottomed pan, melt the ghee. Into this add the rava and stirring constantly, roast it until the rava turns a light pink and glossy. It should be around 7-8 minutes. Switch off the fire and stir in the coconut flakes and cardamom powder.

Let the rava coconut mixture cool.

Now in another pan, boil 1.5  cups of water and throw in the strands of saffron. Stir in the sugar and bring it to a boil. Boil for a few minutes until the syrup turns thick into 1 string consistency. 1 string consistency is when you spread a drop of the syrup between your index finger and thumb-tip and it should form a string when you touch and separate them.

Now, pour this hot syrup into the rava coconut mixture. Stir well and let cool slightly. Now, with clean hands, mix them all together and form uniform balls out of them, carefully embedding one or two raisins on each laddoo.

Repeat the process with all the laddoos and let them cool down completely.

Now if you are working with a large batch, chances are that the mixture will dry out about 3/4th way into the laddoo rolling. In that case, don't panic and add 1 tsp of hot milk into the mix, knead lightly and continue making laddoos. but don't add too much as that can make your laddoos crumble or become too soft. Refrigerate in an air tight container, and it should last up to a month.

Making them last that long....that is another story. Enjoy!! 


Friday, June 6, 2014

Easy Peasy Doughnut Holes

This recipe came to me when I told one of my American friends Sherry R,  how I ended up craving doughnut holes throughout my pregnancy, but always after my dinner, and how insane it was to send my poor hubby out on a doughnut run. Ok, I have done it in my hormone driven craziness, but more than 3 times a week? That was the insane part! Buying it and freezing it seemed like a good option until I tried to defrost it. The soggy, sticky, lifeless thing did not resemble like the dreamy glazed puffed up beauties I was craving in the first place. That was when I decided to up my standards and make my own hot, fresh doughnut holes.
And for the ones who still wonder what doughnut holes are, they are small, round, bite-sized doughnuts that the Doughnut chains claim are the bi-product of making doughnuts. I don't buy that! I believe these babies are better than real doughnuts, due to their amazing "poppability" and portion control and they need to be giver a better name than doughnut holes, which sounds like you-know-what, a term for mean people.
So here is my version of Doughnut holes, which my dear friend Sherry and I, both have adapted, because it is so much more better than its Vegan version, which we tried recreating in those early experimenting days.
This recipe makes 12 poppers.


Ingredients

2 tablespoons butter
2 tbsp granulated sugar
1 egg
4 tablespoons buttermilk or milk
1 cup all-purpose flour
1 1/2 tsp baking powder
1/2 teaspoon salt
1/2 teaspoon vanilla extract
Confectioner's sugar (optional)

Doughnut holes, rolled in confectioners sugar, while still hot.


Method:-
Cream together the butter, sugar and milk. 
Then add the egg and beat lightly until combined well. When combined, add the vanilla and stir well.
Sift together flour, baking powder, and salt.
Make a well in the center of the dry flour mixture and pour the egg mixture in. Stir gently. Do not overmix.
In a cast iron or enamel frying pan, heat oil until approximately 350 - 375 degree Fahrenheit.
Drop spoonfuls of the batter in the hot oil. Some balls might turn over on their own as the bottom gets cooked and they puff up. If not turning over on its own, help a little using a fork or spoon.
Fry until its golden brown all over.
Remove from oil, drain well and roll in powdered sugar or enjoy as is.
Goes perfect with Coffee and Tea.

Monday, May 19, 2014

Mamma's Tomato Mini-Pies (Pictorial)

These pies are a result of my switching over to a much healthier lifestyle, ironically. I used to buy refrigerated pie dough for my pies and had a few boxes of them left. I had to find a way to get rid of them soon, before i switched over to a homemade crust and no more processed stuff from the grocers.
I call these stuffed, baked, savory goodies mini-pies, purely because I don't know what else to call them and also because they are made from Pie crust. The tomatoes I used for these are fresh beefsteak tomatoes. Its kind of important to prep your tomatoes before baking, if you don't want your pies to be soggy.
The stuffing can be really versatile. This recipe used a onion-chive-cream cheese topping on the tomatoes. But I have also used Basil Pesto and toasted Pine-nuts on top of the tomatoes, in the past and they were quite yummy too. Other ideas also include Pepperoni and Fresh Mozzarella, Spinach and Goat cheese and Mushrooms and Ground Beef sauteed with Ginger and Garlic. (Oh yeah! So many possibilities!)
These make amazing appetizers or a delicious brunch/breakfast item, as well. This recipe makes 6 mini pies.


So without much ado, here goes:

Ingredients:-
1 pk refrigerated pie crust (2 sheets)
3 tbsp finely chopped fresh chives
3 tbsp finely chopped green onions
1 8-oz pk of Cream Cheese/ Neufchatel Cheese (softened)
1/4 cup Parmesan, grated
2 large beefsteak tomatoes
Salt and Pepper
1 egg- for egg wash (make egg wash by beating lightly 1 tsp of water with one egg)
1 tbsp Nigella seeds (for sprinkling on top of egg wash)

1 cup or bowl that is slightly wider than the beefsteak tomato slices in circumference

Method:-Slice each beefsteak tomatoes into 3 thick slices (excluding the top-most and the bottom slices. make the top and bottom slices thin so that you will have 3 thick, uniform slices that sit flat.) Now, place the slices in single layer on paper towels, and sprinkle salt on top and bottom of each slice. Leave for 15 minutes on each side to drain maximum liquid out of them. Change paper towels if needed.
Bring the pie crust to room temperature.

Preheat oven to 425 degree Fahrenheit.

Mix together the chives, onions, cheese and cream cheese together adding a little salt and pepper to taste.Use a single beater of a hand mixer or use a fork. Using a stand mixer is not recommended.

Flour a rolling surface and gently spread out a pie crust sheet on it. Roll out gently with a floured rolling pin until smooth and rectangular, about 1/2 inch thick.

Repeat with the other sheet and make sure they are uniformly sized, though not necessary to be accurate.
On one sheet, place the 6 prepped tomato slices, uniformly spaced (at least 2 inches of space between each). Sprinkle ground pepper on top.


Divide and spoon the cream cheese mixture  on top of the tomato slices.


Now brush egg wash, all over the exposed parts of the loaded pie crust. Cover the first loaded pie crust sheet, with the other sheet of pie crust and press down gently so that it sticks to the bottom sheet of crust.


Now, carefully using the cup/bowl/glass cut around the tomato slices to get mini-pies that are slightly larger than the tomato slice.


 You may crimp the edges of the pie using a fork if they are threatening to come apart.


Carefully, lift each mini pie and place them on a parchment lined cookie sheet.


Cut a small vent on top of each pie, brush with egg wash, sprinkle a few nigella seeds and bake them at 425 degree Fahrenheit for 30-40 minutes, or until the tops become a light golden brown and lightly crack.


Now, let them cool slightly as the filling can be hotter than the exterior.


Serve them as a snack/appetizer or as a yummy main course with a soup and salad on the side. Enjoy!


Sunday, March 2, 2014

Mamma's Sweet-Valentine Strawberry Carrot Cupcakes

I made this deliciously light and fragrant cup cakes this Valentines Day for my family and friends. I have usually seen cupcakes made with pureed carrots, but this one is made with carrots shredded in the food processor. . You could also grate them finely. The point is, to get them to a size which will cook in the same time as the batter takes.
Compared to the plain batter cupcakes, I actually felt good giving these cupcakes to the kids, and when I told them it had carrots, they were surprised too. The carrots in them cook down slow and tender, and gives a nice color, a bite into the cupcake.
Also, this cake uses fresh strawberries which are highly perishable. They shouldnt be left out in the open after being frosted and garnished and use them up within two days. Or remove strawberries from the top before storing in for longer than 2 days.
These cupcakes tastes the best the day they are made. So make sure you make them in limited numbers as they do not store well.
If you want them to make them ahead, omit strawberries altogether and go for preserved cherries or candied fruits.

Makes about 24-30 cupcakes

Ingredients:-
2 cups all-purpose flour
1 cup sugar
2 tsp baking soda
2 tsp ground cinnamon
1 tsp grated nutmeg
1 tsp vanilla extract
1 tsp salt
4 eggs
1 1/2 cups canola oil
2 cups grated carrots
1 cup chopped strawberries
Cream Cheese Frosting:-
16 oz cream cheese, room temperature
1/2 cup butter, room temperature
4 cups powdered sugar
1 tsp vanilla extract
Liquid food color in Red- enough to tint the frosting pink (optional)

Fresh Strawberries to Garnish (see image)


Method: 
Preheat oven to 350 degrees F. Line 2 muffin pans with cupcake liners and lightly grease the liners using cooking spray.

In a large bowl, stir together flour, sugar, baking soda, spices and salt. Add eggs and canola oil. Blend well, until combined. Stir in vanilla extract, strawberries and carrots.

Pour into muffin pan. About halfway should suffice.  Bake for 25-30  minutes. Check with toothpick. If its wet with batter, bake for 5 minutes and check again until done. Remove from oven and let cool down for 10-15 minutes. Wait to frost until the cupcakes are completely cool.

For the frosting:
Cream the cream cheese using a hand mixer until smooth. Add the butter and mix well. Slowly add 1 cup sugar at a time and mix well on low speed. Add vanilla and food coloring. Increase the speed now and whip until slightly airy and spreadable.

Spread the frosting over the cupcakes and decorate with the strawberries. Enjoy with your loved ones! :-)


Sunday, February 23, 2014

Old Fashioned 3-ingredient Blackberry Jam.


 A Mid-Summer Jam Story....or should I say Short Story???


It all started one day, when I heard the sound of heavy vehicles, on the road that goes nowhere, right behind our house.I peeked out of the tiny hole in our fence, only to see that there were two buof Blackberry bushes that grew on the other side of the road. It was a little sad to see them being cut down like that, without any warning or notice. But my logical brain kept on reminding me that Blackberry Brambles are really aggressive bushes that creep and spread like wildfire, can be very invasive and doesn't go down without some serious fight.


My son, once got stuck in one such bramble and in an attempt to get out, got himself almost seriously hurt. He healed just fine, but I could never bring mysef to hate them.These thorny bushes used to hang down heavy, laden with tiny, plump, dark, sweet fruits, which oozed sticky juice as soon as you bit into them. It had become a summertime tradition for kids to go and pluck as many blackberries as they could from the never ending supply those brambles provided. Then the next two days, they would be devoured as is, or stirred into batters of pancakes, waffles and muffins or spooned on to almost everything in the form of luscious compotes.


The last Summer, maybe the kids grew competitive, or maybe it was indeed a bountiful season, we got 3-4 kiddie baskets full of blackberries. These fruits never last fresh more than a couple days, so I was pretty nervous about letting them go to waste. Finally, I made up my mind and decided to make a Jam. But I  wanted to make sure my Jam didnt have any unwanted chemicals or preservatives in it. And what do you do when you need tried and tested recipes, perfected the old fashioned way? You call your Mom. Period.

My Mom always made jams and ketchup at home, and I hardly remember our pantries being ever empty.
I asked her about Jam basics, but our first ten minutes on the topic resulted in a lot of confusion, as she had never made Blackberry Jam, and hence was adamant in parting with her recipe. I finally had to convince her that I would never "abuse" her pure recipe, and only then she told me the recipe. It was simple! 1:1:1!!!!!

I bet she laughed her ass off (Um, sorry Mom, I meant rear end!) after hanging up on me. Oh, Well!!

So this 1:1:1 is the basic recipe behind all her Jams, the numbers denoting the proportion of Sugar to Fruit to Lemon juice. So there is no long story to make short. That is just what I did!
 I had roughly 5 cups of fruit. I washed them really well, dried them with paper towels, and gently mashed them with a wooden spoon.
Then I mixed 5 cups of sugar, the mashed blackberries and  5 tablespoons of freshly squeezed lemon juice together, in my heavy duty sauce pan, and brought it to a high boil. I kept it in high boil for 5 minutes,  then reduced the heat to medium-low and simmered it for 20 minutes. Then I removed it from heat, covered the mouth of the sauce pan with a clean dry cotton cloth, and left it to cool.
Not lukewarm cool, but really cool- for about 6-8 hours. When it cools down, it thickens up real nice.
That's when I bottled it up, in sterilized jars, and sealed it to use long after that bountiful Summer is gone.
Please note that : This recipe uses blackberries with their seeds. So, if you prefer a smoother jam, while you are mashing them down, do it in a sieve so that you extract the maximum pulp without seeds. Then, follow the rest of the recipe.


In hindsight, making the jam was one of the best things I did! Because I still have 2 jars of that sweet, tart sticky goodness to remember those brambles by! Until they grow back to the joy and delight of bored kids of Summer, and the terror of overprotective Moms in the neighborhood, I have my delicious jam which never fails to evoke the memories of hot sun, lazy afternoons and cool breezes of summer in that one sweet, tart spoonful. 


Thursday, January 23, 2014

Mamma's Almond Surprises


I have never liked any American Chocolates except Almond Joys. I am not being a food snob, but after spending the first 22 years of my life strictly seeing Cadburys Dairy Milks and exquisite European chocolates (thanks to friends and family who made a stop at Duty free Shops) as a vital food group, you just cant stomach a Hershey Kisses or a Milky way bar. Its just too sweet for me. But I have to say, not belonging to the too sweet category are Dove. Lets just say, one piece of that slow melting milk chocolate keeps me sane after a bad day, infinitely improving my mood.
Note to self: "FOCUS!"

I have been making healthy changes towards myself and my family, starting last year. As a part of that big overhaul, I made an attempt to cut out processed foods (which is still an ongoing process) , I tried my hand making my favorite Almond Joys at home sans the hydrogenated fats and preservatives. I also wanted to make them in one perfect serving size unlike the originals which messed with my will power with those two bars-in-one-pack bait.

Two things: 
1. I was pretty much streaked all over with chocolate and didnt want to ruin my camera. The pictures have been taken on my phone. I apologize in advance for the poor images.
2. This recipe serves 20 balls. I dont want to say how much is one serving size. It wont be fair. Feel free to choose your serving size and do keep in mind the last line of this post.

The first time making it, I was impressed by the simplicity of it. I hope you will too. So without much ado, here goes:

Ingredients:-

10 oz sweetened, flaked coconut
10- 14 oz can of condensed milk
1/2 tsp sea salt
12 oz semisweet chocolate chips
2 tbsp coconut oil
20 toasted, salted whole Almonds


Method:-
In a medium bowl, stir together the coconut, condensed milk and salt. (You might not need the entire can of condensed milk. I had about 1/4 can leftover which I used up for a Cold Coffee). Better yet, gently knead it with your fingers to make a dough like, sticky, mixture.

Shape roughly into 20 balls. Place a toasted Almond in the center and perfect those spheres. Take care you dont leave any cracks. One way to achieve this is to press them down firmly to help them stick together and then shape it to get a crack-proof ball.


Place the spheres into a wax paper lined cookie sheet and pop them into the freezer until they are firm.
Meanwhile, melt the chocolate chips in a double boiler or melting pot. Take care it doesn't burn. Stir in the coconut oil. Keep it warm.


Bring out the frozen coconut balls. Carefully dip them individually in the melted chocolate and arrange them in another wax paper lined cookie sheet (or you could be a resourceful laddie like me and just flip over the earlier mentioned wax sheet and plop these beauties on them)

When they are hardened enough, remove carefully from the wax paper and arrange in tiny pastry cups or just save the planet, forego the wrapper and deposit them directly in your mouth. Enjoy! :-)


Please note: These might not have preservatives or chemicals, but are by no means a diet food. Relish Wisely! 

Wednesday, March 27, 2013

Mamma's Soft Chewy Butterscotch Chip Cookies


Sometimes, the best things in life are very simple. A perfect book, an unexpected hug, an out-of-season flower and such other silly things are what makes me happy. Maybe, because I am not complicated, or also maybe because, I am an idiot who yet has to experience the sophisticated. Either way, I am happy where I am!
Talking about simplicity, this cookie recipe is one of the simplest to make. Though made by simple ingredients and simpler methods, the end product is a soft, chewy fragrant cookie, that is a match-made in heaven to complement a simple, cold glass of milk. If you are like me, who likes simple things, this recipe is for you. Do post a hug on MMP Facebook Page, if this recipe made you stop looking for a better cookie. (Wink!)


Ingredients:

Wet:
1 cup unsalted butter, softened
1/4 cup white sugar
3/4 cup packed light brown sugar
2 tsp pure vanilla extract
2 large eggs, at room temperature

Dry:
2 1/2 cups all-purpose flour
1 tsp baking soda
1 tsp salt

Other:10 oz butterscotch chips


Method:-Preheat the oven to 350 degrees F.

Gently sift together the flour, baking soda and salt in a big bowl.
Cream together the sugars and butter with an electric mixer until creamy. Introduce the eggs to the mix one by one, mix well until incorporated, then add the vanilla extract.
Add the dry ingredients to the mix and mix well until a smooth dough is formed.
Stop the mixer and fold in the butterscotch chips.

Now, using a measuring spoon (tablespoon) scoop some dough and roll in your palms (they better be clean) and put each ball into a parchment-lined cookie sheet. You can put about 9 of those balls into a cookie sheet, without crowding them. This recipe makes about 24-30 cookies depending upon the size.

Bake for about 11 minutes and cool them off, for 5 minutes in a wire rack. Store in air-tight containers. Try not to store them for more than a week (as if they are gonna last! hehe!)
These are so yummy right off the oven.

*Mamma's Note:  If you want your cookies crunchy, just arrange cookies in a single layer in your cooling rack and leave them in the cooling oven after you are done with the baking and has switched off the oven. The reducing temperature removes any moisture in the cookies and makes it crunchy. *

A very happy Holi to all my Desi Readers and warm Easter wishes to all my Christian Friends! Enjoy and be safe!

Wednesday, January 9, 2013

Making Chakka Ada /Jack-Fruit Dumplings away from Home

I was a kid born towards the end of an era where there were no TV, Refrigerators, or even uninterrupted power. I was raised in my grandmother's house, which was 30 minutes from the nearest asphalt road, by foot. Our food consisted of whatever was caught/dug-out/plucked the same day. Every dish made had its season. Every vegetable was grown within 5 miles, every egg eaten and every chicken killed were from my Grandma's own yard. On a stormy night if we listened hard, we could hear loud foghorns from the very sea where the fish we ate, came from.
Our home was surrounded by huge trees that bore fruits like mango, tamarind, jack-fruit, bread fruit and mini-jack-fruits. Near our fresh water well, we had Amaranth, Drumsticks and Spinach which thrived on the rich soil and shade and also gave us options for days when we didn't get any vegetables. And when I say we didn't get vegetables, it wasn't because we couldn't buy it but because the lady who brought it door-to-door took a day off. I guess we wouldn't have even noticed her absence, if we took into account the expanse of tapioca, my aunt grew in our property.
In short, we lived royally, off the land!!!
Since I was lucky enough to be born in that time, I got to experience the best of both worlds. My grandma would make all three meals at home, over a wooden fire and in earthern pots which to this day, us kids miss sorely.
Our treats were all made at home, with love and all the goodness of nature, even before it was a "cool" thing. One of the most memorable ones were "Chakka Ada" which were essentially rice flour mixed with ripe seeded jack fruit (mashed and kneaded into the flour) and stuffed with a sweet mixture of fresh coconut, jaggery and scented delicately with cardamom. These heavenly dumplings were wrapped in green banana leaves and steamed in a large earthern pot. No one needed to call us kids, we were drawn by the aroma to the kitchen. I remember the feeling of our tiny hands tossing the hot packet up and down to cool it and yet not ready to leave it, anticipating the mouth watering treat, that we treasured in our scalding hands!
Once we managed to open the banana leaves that stuck to the sweet treat inside, it was all quiet except for just an occasional chomping and slurping of fingers.
One of the main characteristics of these "ada",  was the aroma of banana leaves embedded deep into it, that gave off such an inimitable flavor to the last bite, combined with thecrisp aroma of cardamoms, fruitiness of the jackfruit, the earthy sweetness of jaggery and the crunch of the fresh coconut.
Now the strong flashback of this exact taste is what prompted me to try making this nostalgic treat at home, when stuck with 2 cans of jackfruit, I purchased at an Asian Market just to see how canned fruit compared to the fresh ones back home. As I opened the can and discovered how fresh it tasted and how one bite of the fruit brought back a flood of memories, I got to working.
                                                                                                                                                                                                                         
The cure of Homesickness do come in Cans. 
                                   
Now, I mashed the drained fruit in my food-processor and had every other ingredient ready except for one vital part: Banana leaves. I usually substitute aluminum foil for anything that needs banana leaf, still I was a little sad.


My hubby, a great supporter of the cause, remarked comfortingly, that it would just not smell the same, but we have the flavor right here! That clicked something in my brain and I just snatched the last banana that lay lonely in the fruit basket and mashed it into the mix. Hubby wasnt very convinced, but as he eagerly peeled open a foil pouch, that was still steaming, I think I caught him smiling and nodding.
And it was Deja-Vu!!!
Us, peeling away the foil excitedly, sniffing and shrieking as the hot foil made our prying fingers pink, with its steaming contents.

If all this narrative got you interested, here is the recipe for these yummy Adas.
This recipe makes 6 Adas.

Ingredients:-
2 cups Rice flour, dry roasted
2 cans ripe Jack fruit, drained and mashed in a food processor
( If you are lucky enough to get hold of fresh ones, about 12-14 seedless pieces of fruit)
1 ripe green banana, mashed
1/2 cup grated fresh coconut (you can also use frozen)
1/2 cup grated jaggery
2 pinches cumin powder
2 tsp ground cardamom seeds
1 pinch salt

About 6 squares of aluminum foil, each enough to wrap and seal a twin deck of cards.

                           
Flattening the Dough.
Sealing it. Then into the Steamer.
After it comes out of the steamer. 
From the Foil, onto the Plate!!!
                           

Method:-
In a mixing bowl, mix together all the ingredients and knead gently into a sticky dough.
Divide into 6 portions.
Place each portion inside a foil square, gently press and flatten the dough within the foil to get uniform thickness all over. Be careful not to get overambitious and squeeze the dough out of the foil. Seal it by folding over the edges.
Repeat with all the dough portions.
 In a steamer, steam the foil packets for 10-15 minutes. Let cool down for 3 minutes, in a plate/rack before opening the foil.
Open, slice and enjoy!

Monday, October 22, 2012

Nan-cut aka Naan Khatais aka Indian Eggless Cookies

My 9 yr old son has been interested a lot lately in knowing all about his Indian Culture and especially food roots. So far, I have been able to present it to him in interesting ways, to keep him intrigued and and curious-er (Yeah, I don't think there is such a word either...especially after that wavy underline by my much hated spell-checker.)
So this other day, he threw me a perfect googly by asking me about baking and India. Nope, Indian Cuisine is not very big on baking, I told him. "While I was growing up, in an average community the only ones who baked were bakers, and people never bothered baking anything when delicious baked goods were available just round the corner and at such cheap prices too. Economically, buying an oven for the home was like an unnecessary luxury, and a nuisance if you factored in the frequent power outages and voltage fluctuations.
So, no...I dont think there were any Indian cookies!"
But, this tiny voice at the back of mind kept telling me I missed out something...something yummy, warm, something that melted on your tongue and left a tiny deposit of fat on the roof of your mouth, something you begged your parents to buy as soon as you saw a "Khari-wala" with his large aluminium trunk filled with warm, fresh baked goodies that he sold from door to door.
"Naancut!!!!"
It came to me in a second. These tiny rectangles of sweet heaven that Mom used to buy as a special treat, for tea times. Of course, they were the Indian goodies that could come close to cookies, and give them a good head-to-head competition, too!


It got predictable from there...the kid wanted to taste them and I made a few phone calls back home and a couple emails to friends to find if they had a recipe. And though none had/give a proper recipe, I was able to get the general proportion of flour to ghee to sugar. And then I tried it out. Call it beginners luck, the first time was just perfect. I picked out one hot cookie, huffing and puffing like a big bad wolf, and doing that weird "hot" dance.  The light cookie melted into a warm sweet nothing in my mouth and the light aroma of cardamoms and ghee invaded my senses, flooding my brain with memory  flashes of lazy evenings, sweet bites of Naan-cuts and tea not tasting sweet anymore, with the sweetness of the little rectangles invading our the taste buds.
Just so that you also can be a part of these heavenly experience, here goes the recipe:---

 Ingredients:-
1 cup all purpose flour
1 cup sugar (powdered)
1 cup ghee (clarified butter) + a little more
* Clarified butter is nothing but butter without any water to it. In order to make a cup of ghee, just melt about  1.25 cups of butter in a pan,  on low heat. Stir occasionally. Soon all the water will evaporate and clear ghee will be formed on the bottom. Spoon off the scum or the froth from top and use as needed.
1 tsp baking powder
1/2 tsp salt
1 tsp powdered cardamom seeds (optional)


Method:-*When it comes to Indian recipes, I believe using your hand to knead any dough, brings authentic results.
But you may use a hand mixer here, if needed.

Preheat oven to 350 degree F.
Sift together salt, baking powder, cardamom and flour together.
Mix together the sugar and the ghee and blend well. Add the flour mixture into it and knead into a smooth mixture. A spoon of ghee spread between palms, pat it down.
Now, roll small balls from the dough and lay them on a parchment lined cookie sheet about 1-2 inch apart from each other.
Gently press each ball down, into a flat disk shape.
Repeat until cookie sheet is full.
Bake at 350 F for 10-15 minutes or until the bottoms are lightly browned.
Cool for 5 minutes before removing them from the cookie sheet.
Makes about 20 cookies depending on the size. Enjoy.

Wednesday, October 3, 2012

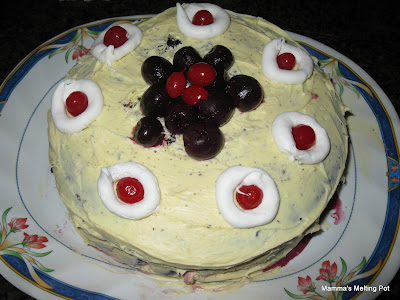
How Mamma made her first Black Forest Cake.


My dear Peeps,
Since I haven't made a decent post in months, lets start on a sweet note.

"Black Forest Cake"- A mysterious name, for a dessert which gives no hint or clues to whats in there, to someone who haven't tasted it. And to someone who has tasted it, the name uttered gives an instant flashback of the  sensory explosion that makes this dessert unforgettable! The creamy, sweet, frosting, the heady perfume of cherries exploding in your mouth, and the lush cake which melts into warm sweet nothings like a lovers breath.(Darn, did I just wax poetic about a cake???)
Well, there was a reason to all this cheesy wax and eloquence. It was that time when Romance was in the air, and media emotionally blackmails you into buying loads of chocolates and coffee mugs at the last minute for your valentine.
Forget the Media,  Romance was what came to my mind, whenever I used to think Black Forest. So making an ADD -prone recollection short, I decided to make this Cake for my Valentine (of a decade and then some years) as my way of showing I still love him; (despite discarded socks in the living room, despite him attending more calls from office than from my cell-phone, despite him being more lazy around home than I'd prefer....well! You get the idea! :-D)

 The original Black Forest Cake is made with a light, airy chocolate sponge cake, and the frosting is heavy whipped cream . Its stuffed with Cherries in heavy dark syrup. We are not talking about just a light and heavy dessert, but a heavy-duty sinful one that will send us straight to guilt hell. As a couple we both hate heavy desserts and our sweet tooth happens to be pretty microscopic too. Silver lining?? We do have them.
Gray Area?? We couldn't order one or refer to one off a chef's site and try making it. I had never made one before, so if I had to make one, it needed a spanking new recipe to suit our delicate tastebuds, or an existing one needed major improvisation!!!
 Fishing around for a base recipe, I saw loads of American versions, with cream cheese frosting (too heavy!!!) butter-cream icing (too sweet!!!!) and chocolate fudge (yuck!!!). After imagining the combinations, I couldn't even bring myself to bake one of those. My vision of a perfect B.F.C. was an airy chocolate cake weighed down by fresh cherries soaked in liquor, layered and topped with light cold whipped cream.

The Icing I chose to go with it was a store bought whipped Butter-cream Icing, which I realized was not enough, halfway into the icing. Random vent: How come you have more than enough when you make it at home and fall short when you buy it from store? Grrr.


And thus started coming together my Black Forest Cake: The base- my very own spongy chocolate cake- and not a cake mix.
 I usually HATE ready cake mixes, except Angel Food Cake mix. That is something I don't mess around with. The respect comes from *NOT* being able to achieve the lightness with the recipes I came across and tried.
So for the cake, I whipped up my favorite original recipe moist chocolate cake, in two 8" cake pans.
All the versions of BFCs usually had a cream filling and only a few of the authentic German ones had real Cherry filling, and I desperately wanted that special touch in my cake.


 The filling I used was a mix of canned Sweet red Cherries and home-made cherries in brandy and syrup, that I made just for this occasion. Grocery Independence....though it was in part, Yay Me!
(BTW, Its easy- Make hot sugar syrup and add washed, pat-dried, seeded cherries to it. Cook until tender. Stir in brandy, for pure adult enjoyment and a little germ-killing too. I cant say about shelf life because I just make it for cakes as and when needed and the leftovers get licked!) And use the leftover brandy sugar mixture to drizzle on the cake.

And I slathered on the Icing generously between layers and on top (as much as my meager can would let me.)


And after an attempted stunt of creating chocolate sculptures as in Top Chef (Thjs image up there^^^which looked totally abstract, btw), my cake was ready (or had I given up trying any more?)
Melted chocolate, spread thin on plastic wrap and thrust into freezer for 5 minutes gave me enough thin sheets to stick onto the icing to give me that chocolate stone-wall kind of image I had in mind (as you can see, not quite!)
Finally, I topped it off using cherries and some store bought white-icing-in-a-tube-thingy supposedly used to ice decorative cakes. For color,  I added some amazing Indian Cherries (which is not a cherry at all...they are Bush Plums or Karandas that are closely related to the plum family, and used in a lot of bakery products in India. Want to read more about it, then go to http://en.wikipedia.org/wiki/Carissa_lanceolata for some nerdy light reading. )
Then in went the cake to the chilly depths of my refrigerator to be emerged as a surprise dessert after dinner. The surprise was all out by excited, giggly kids, who couldnt wait to tell Dad about it. But so what, the cake was a hit, and I felt the warm fuzzies as we digged into it, amidst Mmmms and Hrrrmmms. Or maybe it was the chocolate and brandy mixture.
Anyways, it was good enough to try making it again with the kinks straightened out. And stay tuned for the recipe. It will be posted here....where else?

Love ya all,
Mamma


Wednesday, February 22, 2012

Milk- Rice Kheer/ Paal Payasam


There are some things that I love in American Cuisine and then there are somethings I absolutely refuse to touch. Though the things I like clearly outnumbers the things I hate, these pet peeves have been too strong to change, thanks to the diversity of tastes we were raised with! Let me share with you the topmost one of my Peeves: Its "Too Sweet"!
Yes, Too sweet are the desserts that I have found in the pursuit of good grub, even with the substantial sweet tooth of mine. I swear, I make this statement purely on the basis of the desserts I have tasted.
The very first thing I took a bite of and never took another bite was an Apple turnover, my husband bought for me from a local bakery, The delicate pastry had a sweetened, flaky puff pastry shell. (Good, so far! ) Inside was a filling of tender cooked Granny Smith apple slices, with brown sugar. OK, Its slightly above the head now. I'd still eat it if it stopped at that. But to my shock, it had a white icing drizzled on the top and dusted with powdered sugar. The beauty and the simplicity was lost in the throat-dizzying, coma-inducing sugary sweetness. And as if that was not enough, the serving suggestions showed it served a la mode (with a scoop of ice cream). Forget the obesity, and other health issues, I wondered if the peeps buying these "killer" treats had exponentially jaded taste buds, to have it as a dessert, on top of a meal.
Later on, I came across Pies, Shakes and Cakes that were not only a shoo-in for the "too-sweet" category but also made me create a new Category-"Too Rich"!
On our way to Idaho for a family Vacation, we had one of these shakes at a fast food chain. My kids are big fans of Oreo cookies and on display of good behavior, I don't mind treating them with a plate of the Mint Double stuffed ones, which also happen to be my favorite. So no wonder, as soon as they saw, a Mint Oreo Shake on the Menu, they wanted to try it. My hubby bought the tray of food and drinks to our table and I almost fainted, when I saw the tall glasses, filled with at least half a pack of Oreo cookie chunks, mint ice cream and milk so thick, I could've sworn it was cream. I mentally calculated the possible number of calories in that glass and couldn't think of any thing less than 500. My kids were overwhelmed with the size and after the initial excitement died down, could finish only 1/3 of their portion. Skip, my hubby, took a sip and wrinkled up his face as the cold gooey sweetness, hit the back of his throat. "Its too thick and too sweet", he grimaced. The kids decided to take a nap in their car seats, and we decided to hold on to the shakes, if they asked for it later, as we cleaned up and left.
But the kids' nap turned into temporary sugar comas and they didnt wake up for the rest of the trip. I chucked out the remaining shakes, that were now melted, disgusting frothy goo, in the first trash can we came across, and decided firmly..."No more of these Junk for my kids". It was still a far cry from the one scoop icecream+skim milk+ chocolate syrup sahkes that we make for them at home.
Before you decide, I was harsh and hasty in judging, you must know I was raised in a home, where sweet food was never eaten until 4 in the evening, and even if something mildly sweet was made before that time, it was probably rare, something steamed and usually we had it for breakfast.
As kids, our sugar rush came from Glucose biscuits at evening tea, and fruits that were left out in the kitchen and never lasted more than a day, once ripened. Most of the time, we would have a whole bunch of bananas hanging from low beams of the eating room, or the room right outside the smoky kitchen.
For special occasions like a festival, sweet kheers or payasams, mildly sweetened, and slow cooked in milk and jaggery or sugar, and thickened with coconut milk was "THE" treat. My Grandma and Aunt, on rare occasions made "Ada", a palm sized dumpling, wrapped in banana leaves and steamed , usually made from wheat or rice flour and stuffed with fresh grated coconuts and jaggery. A variation was "Kozhukkattas" which were made from the same flours and same fillings but poached in a flavored mix of ground coconut, cumin seeds and water. Once cooled, the soup in which the balls were simmered would go just as fast, as the kozhukkattas.
I remember as kids, we loved eating the sweet part in the center, and leaving the doughy part for adults.

Kheers or Payasams are one of the main desserts that is omnipresent in every Keralite Festival or special occasion. The milk based, white payasams are regular fare, and eery household makes them for Worship as offerings to God, for birthdays, for festivals. The darker, jaggery based payasams, called "pradhaman" are reserved for festivals like Onams and Wedding Feasts. The more kind of Payasams in a wedding, the grander the affair! The Pradhamans usually take more ingredients and have to be slow cooked, to achieve the rich perfection. The white varieties such as "Palpayasam" or Milk Kheer and "Semiya Payasam" the Vermicelli Kheer are popular due to their simplicity and ease of preparation. In weddings, the vermicelli kheer is served with "Boli" or a stuffed Flat bread made of refined flour and stuffed with a sweet lentil mixture.
That brings us to this simple dessert, which tastes divine and is superbly easy to make. Its preferred by me over any of those too rich or too sweet shakes, cakes and pastries, any day. almost any rice can be used to make this. Purists believe Basmati gives it more flavor and aroma. I have made it even with Jasmine rice. Starchy rices like Chinese sticky rice, give the kheer a creamy richness, making it worth all the effort. Serves 8. (1/2 cup servings)

Ingredients:-
2 cups of whole milk;
1/2 cup rice, rinsed twice.
1 tbsp sugar
3 tbsp ghee (clarified butter)
4 crushed cardamoms, remove the seeds, and reserve the shell
1/2 cup condensed milk
a pinch of saffron (optional, for that light peach color)
2 tbsp of raisins
2 tbsp of blanched, slivered almonds or halved cashew nuts

The last picture was clicked here. After this, as every bowl was filled, it was taken away immediately  with no way to grab a picture that was actually presentable. 


Method:-
In a thick bottomed, non stick pan, heat ghee and when its hot, fry the nuts and raisins in it, until the raisins puff up and the nuts turn lightly brownish. Drain and keep aside. In the same ghee, add the drained rice and roast, stirring frequently, until its glossy and rosy.
Add  1 tbsp sugar and 1 cup of water to the rice and stir well. Add a pinch of saffron (optional) and reserved cardamom shells to it and bring to a boil. Cover it with a snug lid and lower the heat to low, for 10 minutes. Resist the temptation to lift the lid.
After 10 minutes, remove the lid. Remove the cardamom shells, discard. Stir in the milk and the reserved nuts. Bring up the heat and bring to a boil. Reduce the heat and let it simmer for another 30 minutes, without a lid. Stir occasionally, scraping the sides and bottom, to dislodge the cream accumulating there.
Meanwhile, roast the crushed cardamom seeds, and ground them in a coffee grinder or by using a mortar and pestle.
After 30 minutes, the kheer should be now thickened slightly, and creamy.  Stir in the  crushed cardamom and condensed milk and turn off the heat. Cover and let it rest for another 10 minutes and serve warm or chilled.


Thursday, February 9, 2012

The Big Falooda

Falooda is a very popular Indian dessert, or you could call it a drink, introduced by Parsis, (not to be confused with Farsi or anything else middle eastern) an economically powerful sect who know good food. Its similar to Parfait and has these amazing layers of varying textures and flavors. In India, vendors push around falooda carts or park in populous spots during hot evenings, and families gather around for a cool refreshing change of palate. The main ingredient in Falooda is milk and loads of it. Unlike other Indian desserts which use milk, falooda uses a thinner leaner milk, which makes sure the drinker, is not weighed down and at the same time it has enough carbs in it, to give your tummy that full feeling, if you have decided to have some snack and a falooda, and call it a meal! My first time eating (or drinking) a Falooda was when I was about 15 years, and hanging out with a close group of friends in a crowded funfair. The Funfair had all the usual carousels, small stalls with carnival games, and our favorite assorted haunt of tiny food, jewelry and toy stalls.
The pulsating throngs, the twinkling lights and the noises were just what us older kids needed, who could take care of themselves, and still feel safe in the crowds.
As our shopping bags and tummies loaded up, and at least 3 rounds have been made to every stall, we decided to head home, and try out the cheap merchandises that would drive Mom nuts for days to come.
And we decided to spend the last change on something to drink and the nearest one we saw was an Old Man, with a cart, full of colorful syrups, and huge steel barrels containing milky-sweet vermicelli dessert. My Mom was big on outside foods and food poisoning and had strict rules on what to eat and what not to eat from stalls; so I refused peeking suspiciously at everything. But eventually peer pressure won, and I decided to try, falooda, and keep it a secret, from my germ-phobic Mom.
The Vendor took a large long glass, and plopped a big spoonful of gelatin into it and followed up with a thick milky layer of cooked tapioca pearls, and followed up with the vermicelli, cooked in milk and flavored with rose syrup. Then he added something really suspicious-looking, black and gelatinous, which reminded me of frog eggs, in the local pond. And just as if to take my mind off it, he added a big scoop of icecream and topped it with rose syrup. I looked at everyone, and saw everyone scooping, eating, chugging and slurping, and decided to follow the suit. And believe me, in the October heat of Mumbai, amidst all that crowds, I had this epiphany of how much of a good thing I was missing, all this time, as I spooned this amazing crazy mix of flavors, textures and smells and savored it.
The ice cream at the top, melted in my mouth and the refreshing scent of roses embraced my nostril, refreshing everything it came in touch with. The vermicelli milk was cold and I could feel it smoothly going to the base of my stomach, filling the last 5% of whatever stomach space we had left. The "frog-eggs" were some kind of seed, which was gelatinous and thinly layered on the out and crunchy as I chewed it between my incisors. And as I grew bolder, I thrust my spoon to the bottom and scooped up the jelly and mixed with the sweet milk and chewy mini globs of tapioca, it was sweet and tangy and a total change of scenery. And as the glass emptied, my friends looked at me and I smiled real big and nodded amongst the I-told-you-so-s.
And Falooda made my list of approved  and favored foods from that day on wards.
The ready-made mixes available at general stores in India always had the Vermicelli, Sugar, Rose Flavoring and Sabza (basil) seeds{the black frog-eggs thingies} mixed in a pouch and all one had to do was cook it all in milk, chill and serve it with Gelatin and Ice cream. It lacked the thick sweet slimy texture from the tapioca pearls.
I didnt bother until recently I went to a friend's place where she brought out falooda for my kids and hers. Her version was similar to my first encounter with falooda. It had everything! And upon asking her, she told me that she got a different mix of falooda from a Middle eastern grocery store, which sold Falooda kits, with everything, but actually tasted different. She also had the same readymade mix I used, and combined both the packs, and seperated them into 2 portions to use later. But I could see that it was not a very practical plan of driving across the town, to get this, then stock up with the Indian mix, and then mix them together AND cook it up!! For someone who loved Falooda THAT much, I thought it was worth going into an experiment.
And thus started my quest for that perfectly refreshing tall glass of falooda, with all the fixings. It was fairly easy once I deconstructed the ingredients and tried putting together one by one. Its no shortcut dessert like a Gits Gulab Jamun or readymade frozen desserts, found in Indian grocery stores. This is one beautiful, fulfilling dessert that will be fun for the kids and filling for the adults, and if you watch the calories, while you put it all together, its going to be super light too! A milkshake will carry more calories, than this!

This recipe serves 6 adults.

So without much more ado, here it goes:-

Ingredients:-
4-6 tbsp of Rose syrup (needed at various stages
6 cups skim milk (divided)
1 cup thin vermicelli;  pre-roasted if possible ( A good substitute is the thinnest rice sticks you can find in Asian Markets. Anyways, if you are using rice sticks, soak them in hot water and drain, then add to milk)
1/2 cup tapioca pearls, cooked in 2 cups of  water (pref in a pressure cooker)
2 tbsp sabza seeds (basil seeds/ takmaria seeds) soaked overnight, in warm water.
6 tbsp of sugar (divided) or you can use artificial sweeteners
1 pkt rose or strawberry flavored gelatin( like Jello)-- made as per pkg instructions
4 scoops of Rose/ Vanilla/ Saffron ice cream


Method:-
1. In a non stick sauce pan, bring the milk to a boil and add 5 tbsp of sugar and vermicelli and cook the vermicelli until done (abt 10 mins for most pre-roasted varieties). The noodles should be tender and holding shape. Dont let them get mushy. Let cool.
2. Once the Vermicelli cools, add the cooked tapioca pearls and remaining sugar. Mix in the rose syrup and the sabza seeds. Stir well until combined. This is the base of the Falooda. Depending on how you like it, thin or thick, use it directly or diluted with milk.
3. Immediately before serving, fill a fancy dessert glass or a tall glass with 1 scoop of prepared gelatin, into the bottom of the glass, add the milk vermicelli mix, to reach 3/4 level of the glass. Then top it off with ice cream and more rose syrup if needed. Serve with a long spoon to reach the very bottom and scoop up all that last bit yumminess. Enjoy!!!

* For a beautiful presentation, or for a special impression, use fresh rose petals as a topper and on the base plate holding the goblet/glass. ;-)

** Since I got more than one question about Sabza Seeds, I am posting a link here that will help in identifying the spice.
http://www.mylot.com/w/discussions/2295791.aspx
 No, Its not Nigella! Its also known as Tukmaria/ Falooda/ Basil Seeds. I know we get Basil seeds at any garden store, under the name Ocimum Basilicum. But since those seeds are not for edible use, (think chemical fertilizers), using them is not recommended. If you can get organic seeds, from verifiable sources, then clean them in hot water a couple times and you are ready to go!
Another tip is to go browsing in Asian Markets selling groceries. These seeds being the major ingredient in bubble teas and Thai/ Vietnamese soups, who knows? You might just get lucky!
Wednesday, November 16, 2011

Pepperminty Hot Chocolate


I am a die hard fan of Chocolate and will eat as much as I can, and gladly skip lunches to compensate. Well, no one likes to admit these secrets of addiction, but I'm sure there are many like me out there, who might not feel alone, on this! (wink)
This Hot chocolate recipe was originally made of heavy cream, but that definitely didnt appeal to the halo-ed side of me, so I came up with the full fat milk version which IS just as creamy without all that artery clogging stuff. My very dear friend, who is a protein freak, made my recipe by substituting the whole milk with her protein mix and it did taste good, despite her hubby sounding like a Howitzer the whole day (One of my main reasons of hating Protein add-ons. Which girl in her right mind, would want to break the romantic notion of boys, that Girls dont fart???)
Either you go traditional with cream or pick full fat milk, or use hot water and drinking cocoa, just make sure the liquid is real hot...less hotter the liquid, the grittier the chocolate!
And Grown-ups, do try spiking it with your hard liqueurs. Kahlua Chocolate or Coffee Liquors are excellent with Hot Chocolate.


Ingredients:-
3 1/2 cups whole homogenized milk
6 ounces bittersweet chocolate, grated or use the ready made chips- just make sure they are chopped fine or grated.
a pinch of salt (Ooh, yeah! Think I'm B.S ing? Go ahead try it with and without salt, and tell me which tasted better! :-P )
6 tsp sugar (more if you need it, but this much sugar is usually enough for me)
1/2 tsp peppermint oil or 1 tsp peppermint extract
Whipped cream, optional
Chocolate shavings, for garnish....Not Optional, Cmon!
Candy canes---definitely optional...its just to make it look fancy! ;-)


Directions:-
In a nonstick sauce pan, heat the milk and when its really hot and boils a little, add the sugar and chocolate. Let it come back to a gentle boil, with froth rising up. Keep stirring until it thickens a little. Stir in the peppermint and salt and remove from heat.
Pour into nice fat coffee or mocha mugs and add some whipped cream on top, then arrange a few chocolate shavings on top of the fluff. Now, just throw in a candy cane into the mug, and serve. Use immediately, and is best when freshly made. Enjoy!!!
Very Italian Biscottis


I know I shared the Macadamia Studded Biscotti recipe earlier, but if you were patient enough to read through the entire post, you must have noticed how whiny I was with the eggy smell of the biscottis that actually disappeared after 2 days. And if you made it with eggwhites and less sugar, it was nowhere near the original thing. I wanted to share the most original recipe I have ever tried and I googled up recipe after recipe trying to find the original taste. And found the one that I loved. Who cares if it has too carbs or saturated fats? Some originals became memorable only because it was made that way...So three cheers for classics made by Moms, Grand moms and anyone who cooked!
This hard cookie stays good in an airtight container (if not dipped in chocolate, otherwise they disappear like the
And like all Grandma's yummies, this one makes about 80-90 cookies, enough to feed a football team....So make sure you half the recipes or have lots of snackers around!


Ingredients:-
6 1/2 cups all purpose flour
1 1/2 cups almonds, roughly chopped
6 fresh eggs
1 cup e.v. olive oil
2 cups sugar
4 tablespoons anise seed, roasted and ground
1 tablespoon baking powder
1 teaspoon salt

Optional Chocolate Icing: 
1 bag of white chocolate morsels


Preparation:-
Heat oven to 350 degree Fahrenheit.  Grind the anise seed finely in a coffee grinder reserved for spices, or with a mortar and pestle. Beat the eggs and oil together until well mixed and lightly frothy, then add sugar and anise. Gently stir all the dry ingredients together and then stir into the wet mix. Stir in the flour, baking powder, salt and almonds and mix (by hand or a spatula) until the dough forms and is slightly sticky but smooth.

Now, divide the dough into six pieces, lightly flour and roll each into a log and roll it out slightly to make  thick, uniform rectangular-ish shapes. Place on two greased or parchment lined baking sheets and bake until they just begin to brown and the center is cooked, for about 25 minutes.

Remove from the oven, lower heat to 300 degrees F and slice them diagonally (about 1/2 inches thick) and place back, cut side down on baking sheet. Bake 10 minutes, flip and bake another 10 minutes or until lightly browned and crisp.

If its still not hard enough, just leave them in the oven, after turning the heat off. But make sure you keep an eye on them and check every 5 minutes to make sure they don't burn or get too browned.

Melt the white chocolate chips in a double boiler/ microwave/fondue pot with a tablespoon or more of shortening, and dip the ends of the biscotti in it and let them firm up on wax paper. To speed up, leave them covered in the refrigerator. You can also fill up the melted chocolate in a zip-loc bag, snip a corner and draw diagonal ribbons on the biscotti. Usually one bag is enough for all the biscottis and any leftovers is always thrown into the waiting mouths of my two chocolate disposal units :-)

Store the biscottis in airtight containers and it sure tastes better with every passing day. Enjoy!


Tuesday, October 25, 2011

Chocolate Cake


This Cake recipe has been my go to recipe for chocolate cakes ever since I started baking. It is dense and moist and gives that substantial heaviness when you need that small dessert to hit the spot.
The rich chocolate taste also goes well with a whipped cream topping and berries too. But that does reduce the shelf life of the cake. So if you plan to serve it that way, make sure you have loads of guests or are at a potluck where it will get eaten in no time.
 I usually make the cake in two 8 or 9 inch pans, and use it for my chocoholic girl's birthdays. My son loves his vanilla cake with loads of icing, and that recipe, I will share some other time. The prep should take some 15 minutes and due to all that heaviness, the cake takes about 1 hr 20 mins. If you plan to ice, make sure you give it sufficient time to cool down.


Ingredients:
Dry:-

3 cups flour
1/2 teaspoon baking powder
1/2 teaspoon salt
1/2 cup cocoa

Wet:-
 1 cup butter
1/2 cup shortening
3 cups sugar (powdered, if you use the Indian Raw sugar)
5 eggs
2 teaspoon vanilla extract
1 cup milk


Preparation:
1. Combine all dry ingredients and mix well.
2. In a big bowl, beat butter and shortening; add sugar and mix well. Add eggs, one at a time, beating well after each addition; beat in vanilla.
3. Add the dry mixture alternately with milk to creamed mixture. Bake chocolate pound cake in a greased 10-inch tube pan at 325° for 80 minutes, or in two 8 " pans for 55-60 minutes until  cake bounces back when touched lightly in the center with finger.
Its always better to use a toothpick instead, known in the culinary circles as the toothpick test, and insert at the dead center of the cake, and see if you have wet batter sticking to the toothpick. If wet, put it back in the oven and bake for another 10 minutes.

All iced up for my little Ms Chocoholic.


4. Let it cool completely once its baked. Then ice it or glaze it as per your choice. Store it, air tight in the refrigerator. It lasts up to 10 days there, if you can get by without gobbling it up.
Its a heavy cake, so make sure you cut it into smaller than usual servings, to avoid wastage. It can fill you up pretty fast.

Wednesday, October 12, 2011

Buttery Sugar Cookies

Sugar cookies are the easiest to make but if done right, they can look like you spent hours creating a masterpiece. I myself have shied away from making these for a long period, because of the fear of unknown. But when I finally made these I couldn't believe how easy these were. Now, I make it with my kids who love to help. And to add to the fun, let them cut out bugs or whatever they are crazy about, and help them bake their creations. Just the smiles and giggles make the cleanup, totally worth it!

Ingredients:-
Dry:-
2 1/2 cup all purpose flour + a little more to dust the board or counter
2 tsp baking powder
1 tsp salt

Wet:-
1 cup or 2 sticks unsalted butter, softened
1 egg
1 tsp Vanilla extract (try to get the clear variety for both the extracts...you will have brighter whiter cookies, that will make a better canvas if you choose to have it iced)
1 tsp Almond extract ( or substitute it with orange or lemon extract for a fun twist. And do match the flavor when you ice)
1 1/2 cup sugar

Method:-
Preheat oven to 400 degree Fahrenheit.
Like any baking recipe goes deal with the wet ingredients first. In mixing bowl, cream butter with sugar until its all light and fluffy. Add egg, beat it well and then add extracts. Dont beat extracts too much, you dont want the alcohol evaporating too rapidly, if you want your cookies to actually smell good.


Now leave the wet mix alone, and move over to the dry mix. Mix together flour, baking powder and salt.
Now using a measuring cup,  add to butter mixture 1 cup at a time, mixing well after each addition. Divide dough into 2 balls. On a floured surface, roll each ball into a circle or any other shape you want. It really doesnt matter, since you are going to use cookie cutters and cut it into shapes.What matters is the thickness. It should be about 1/8th inch. Too thin will burn it to cinders and too thick will mess with the baking time.  Dipping cookie cutter in flour before each use will actually make the dough less sticky and hence more cleaner cuts.


Use an ungreased cookie sheet to gently arrange the cut shapes and bake them for 6-7 minutes or until cookies are lightly browned. Using parchment paper makes sure they slide right off the pan after baking.This recipe will make about 36 cookies depending on what size the cutters are.


And if you mess up a little, and the cookies are burnt a little, dont worry! Just use a butter knife to gently scrape off the burnt part and cover up the mistake with a smear of icing. ;-)
if you want to ice, make sure you wait until the cookies are cooled completely, which should be done in about 30 minutes after you take them out of the oven.


Icing Tips:-
Icing can be done as an artwork- elaborate or funny faces-your choice... or you can up the fun by putting a scoop of icecream between two identical cookies. Or you could just ice the whole batch with a dollop of cream cheese icing and slap them together to have sandwich cookies, whenever you are in the mood. Just make sure you put them in the refrigerator and use it up within one week. Enjoy!!!